What to do with leftover egg yolks

Last week I ended up with 14 egg yolks in my fridge. I’d like to say I had no idea how this happened, or that it was the work of a particularly talented flock of chickens, but in truth it was directly related to the three pavlovas that were cooking  v e r y   s l o w l y  in my oven. I’ll tell you about them another day.

In the meantime, I want to share with you what I did with them. First, I considered doing what my mother-in-law does and tipping them down the sink. Then I came to my senses and asked Twitter for advice.

There were many suggestions relating to custard and hollandaise, but Jen of Blue Kitchen Bakes came up with the most useful tip: freezing them. I knew you could freeze egg whites, but making yolk iceblocks was new to me. Jen said to freeze them with a pinch of salt or sugar (depending on their final use) – so that’s what I did with eight of them.

Four then went into dinner – I’d forgotten what a seriously easy and delicious dinner spaghetti carbonara is: four egg yolks stirred together with a good splash of cream (maybe four tablespoons?), some Parmesan, some finely chopped parsley and some crispy bacon or ham tossed through hot spaghetti.

Two somehow ended up on the floor – oops – but if they hadn’t I could have made mayonnaise or used one as a face mask (egg yolks are full of vitamin A, which is found in all the best beauty treatments, don’t you know?). Or if we had a dog I could have mixed an egg yolk into its dinner for a pelt-improving protein boost.

But the next time I end up with a bunch of egg yolks – or at least 10 – I’m going to make like my lovely friend Andy suggested and whip up this creme brulee ice cream. Well, wouldn’t you?

What do you do with leftover egg yolks? Or whites, for that matter?

We Should Cocoa: The Fame Challenge

This month I have the honour of hosting We Should Cocoa, a blogging challenge created by Chele at Chocolate Teapot and Choclette of Chocolate Log Blog. We Should Cocoa usually asks participants to pair chocolate with another ingredient (you may remember the chocolate and coffee edition last June) but this time I want you to share a famous chocolate recipe. It could be Jennifer Lawrence’s chocolate cake, or the chocolate ice cream most favoured by Brad Pitt. You might be famed for your never-fail chocolate mousse, or your neighbour might be renowned for her chocolate muffins. Either way, I want you to share the recipe.

Taking part is easy. The full rules of engagement are here – but essentially all you need to do is make something involving fame and chocolate, write about it on your blog (including a link to this post, and to Choclette and Chele). Then, come back and add your post to the linky thing below. Tweet me when you’re done (using the hashtag #weshouldcocoa) and I’ll spread the word. In the meantime, let me introduce you to a recipe that deserves wider fame and fortune.

Martin Clunes’ Cold Dog Biscuits
When I was about seven, one of my brothers dared me to eat a dog biscuit. I still recall how it tasted – like a dry, wholemeal slab with a hint of beef stock – but what I remember more was the absolute fear of opening the massive drum the biscuits were stored in in the garage. Seven-year-old girls don’t much like the taste of Tux dog biscuits, but rats love them. I was petrified of opening the drum and a rat jumping out (or worse, wriggling down to the bottom, waiting to jump out or nibble my fingers).

I hadn’t thought about that experience until recently, when a pencil-scrawled recipe fluttered out of an old notebook. It was for Martin Clunes’ Cold Dog Biscuits – a recipe I’d copied out of The Independent in 2005. Then, Martin Clunes was omnipresent on English TV and at work our TV writers were forever going on set visits to Cornwall to watch him make Doc Martin. I couldn’t stand the show and detested that we devoted so much time and energy to the cult of Martin Clunes on behalf of Britain’s newspaper readers. This recipe though, was enough to make me hate him a little bit less. I just wish he’d explained why they were called Cold Dog Biscuits, because they are absolutely delicious. The chocolate is soft and velvety, punctuated by nuggests of cherries, walnuts and smashed up biscuits and pretzels. Just one and you’ll be like one of Pavlov’s dogs as soon as you see fridge door opening.

175g plain sweet biscuits (Rich Tea, Superwine, Digestive – that sort of thing)
50g pretzels (or use more biscuits)
100g glace cherries, halved
100g walnuts, roughly chopped
225g good quality chocolate
225g butter
2 eggs
2 Tbsp caster sugar
1 Tbsp rum or brandy

Line a brownie pan – about 20cm x 30cm with baking paper and set aside.
Put the biscuits and pretzels in a thick plastic bag and seal tightly. Bash the bag with a rolling pin until the biscuits are broken, but not pulverised into dust. Set aside.
Melt the butter and chocolate together over very low heat. Set aside.
Whisk the eggs and sugar together, then add the rum. Stir this mixture into the chocolate, then add the smashed biscuits, along with the cherries and walnuts. Mix until well combined, then scrape into the prepared tin. Smooth the top, then put in the fridge for at least two hours to set.
Slice into small pieces – a little goes a long way – and store in a covered container in the fridge.

Have a great weekend, everyone. If you’re in Wellington, come and buy some baking from me at the Newtown Street Fair on Sunday. If you’re somewhere else, get your We Should Cocoa thinking cap on…

We Should Cocoa – June 2012

After the exhaustion success of the Small Girl’s birthday bash last weekend I’m now taking it upon myself to host a month-long party involving chocolate and coffee and a bunch of people I’ve never met. Do you want to join in?

Choclette, who I imagine as a kind of chocolate Wikipedia, has asked me to host the June edition of We Should Cocoa, a monthly blogging challenge in which participants work their culinary magic on recipes involving chocolate and a special guest ingredient.

I have a special soft spot (also known as an especially soft middle section) for WSC, not just due to the chocolate factor but also because I’ve found so many lovely blogs (and recipes) through it.

So, without any further ado, I declare the June challenge open – and the special guest ingredient this month is… COFFEE.

Whether you fancy an iced coffee or a moccachino, a chocolate flecked coffee granita or a spongy coffee-laced steamed pud, this challenge should have something for everyone. Taking part is easy. The full rules of engagement are here – but essentially all you need to do is make something involving coffee and chocolate, write about it on your blog (including a link to this post, and to the blogs of the We Should Cocoa founders, Choclette and Chele). Then, come back and add your post to the linky thing below. Tweet me when you’re done (using the tag #weshouldcocoa), if Twitter is your thing, and I’ll spread the word.

Mary Mathis’ Chocolate Biscuits
Mary might have a fancier name for these but this is what they were called in Mum’s recipe book. Mary is an amazing woman who, along with my sister-in-law Jenny, revolutionised the culinary landscape of Atiamuri in the 1980s and 90s. This is just one of her excellent recipes,  reproduced here with her kind permission.

This recipe uses instant coffee – oh the shame of it! – use espresso grounds if you like but be aware they will leave a gritty residue in the biscuit (which is ok, if you like that sort of thing). Use either dark or white chocolate in the middle – this is not the time to be sitting on the fence with that vile milk stuff.

125g soft butter
125g sugar
2 tsp instant coffee, dissolved in 1tsp hot water
1 tsp vanilla extract
1 cup plain flour
1 tsp baking powder
1/4 tsp salt
20 squares good quality chocolate (plus a few more, if you think  you might get peckish)

Preheat the oven to 170C and line a baking tray.
Cream the butter and sugar together until soft and fluffy. Beat in the coffee and vanilla, then sift over the dry ingredients. Mix to a soft dough. Take small spoonfuls of the mixture and roll into balls.
Place the balls on the prepared tray and press down lightly, then top each one with a square of chocolate. Bake for 10-15 minutes, until golden. Leave to cool for five minutes, then let cool completely on a rack. Makes 18-20.

Have a great weekend, everyone x

Kitchen DIY: Ricotta

When I was a child there was a popular T-shirt for sale in tourist shops, emblazoned with a slogan about New Zealand being a place with three million people and 70 million sheep. I think it was the 1980s version of the fake New Zealand tourism posters in Murray’s office in Flight of the Conchords (“New Zealand: your mum would like it” etc).Anyway, while the human population has grown to four million, the sheep have dwindled to 32 million. Dairy farms now rule the roost, with around six million cows dotting the landscape.

Rush hour (image via here)

Rather than making New Zealand the land of milk and honey, intensive dairy farming is blamed for fouling our waterways and having a serious impact on soil quality. As if that wasn’t bad enough, market forces mean dairy products are ridiculously expensive, organic or not.
But let me step off my soapbox for a minute and show you my latest favourite trick, DIY ricotta. I don’t have the patience or the extreme attention to hygenic detail to make my own proper cheeses, but ricotta is a cinch.

DIY Ricotta
I found this recipe through Twitter, but I can’t now really recall exactly where it came from. I wrote it down on a Post-it in shorthand (see, being a journalist can be useful occasionally) and promptly lost the link. Proper ricotta is made from the whey byproduct of other cheesemaking, but this is the cheat’s version. Milk thermometers are easily found at kitchen shops (Wellingtonians: buy them upstairs at Moore Wilsons).

1 litre full fat, not homogenised milk
125ml cream
2Tbsp lemon juice or white vinegar
pinch of salt

Put all ingredients into a large and very clean pot. Heat slowly, stirring often, to 96deg C (205degF – which might be easier to see on your thermometer). Take off the heat and let rest for 15 minutes. While that’s happening, line a sieve with clean muslin (or a new Chux cloth) and set it over a deep bowl. Pour the curd-y mixture into this and let the whey drain away.
At this point, you can eat the ricotta warm, drizzled with honey, or you can let it drain in the fridge overnight, covered. Makes about 200g.

Have you ventured into the whole of cheesemaking?

Random Recipe #9: Fear of frying

Oy vey, this months’ Random Recipes challenge really pushed me out of my comfort zone. Not only did I have to let some strange man rifle through my cookbooks, but then I had to confront a life-long fear of deep-frying.

Let me explain. The strange man was Gary from Exploits of a Food Nut. I met him on the internet – you know how it is these days. Anyway, as per Dom’s instructions, I had to choose a recipe at random from Gary’s cookbook collection, and he got to do the same with mine, even though we live some 12,000 miles apart. Thanks to Twitter, that part was easy – Gary got James Martin’s My Kitchen and I got New Pleasures of the Jewish Table by Denise Phillips.
The hard part was realising I was going to have to heat a litre of oil to 200C on my stove top. I’m not sure why I’ve got such a deep-seated fear of frying. I think it might have something to do with being at primary school, when one of my classmates, who was pretty and clever and fantastic at athletics, came back from a long absence with a protective bandage covering her lower leg. She never talked about it and we weren’t supposed to either, but it had something to do with boiling oil and a fire. She later went well off the rails and last I heard she was in jail for GBH after beating up an old lady for her handbag, but that’s another story. This one has a much happier ending, even though I was so overcome with the process that I forgot to photograph the end result.

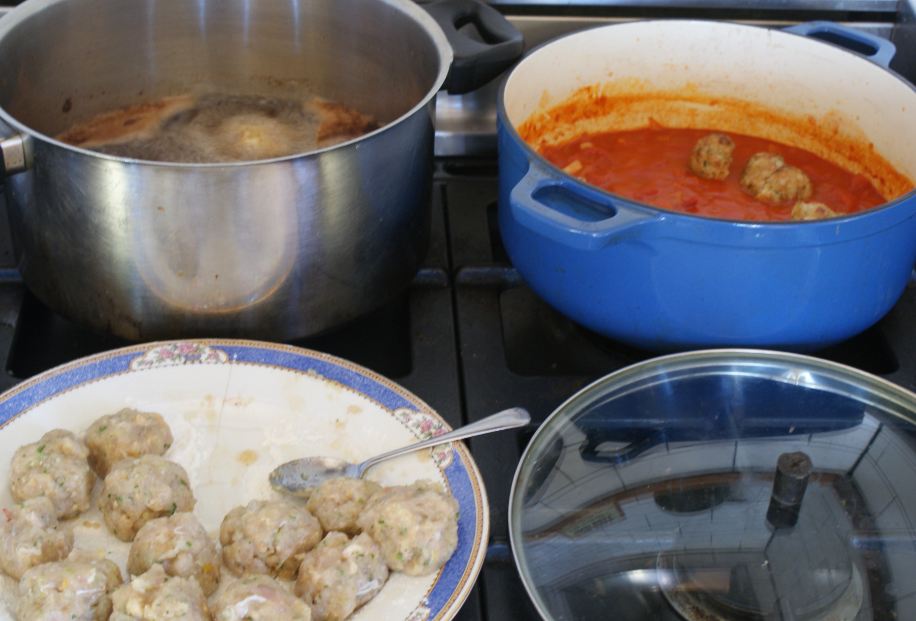
Egyptian Fish Balls with Tomato Sauce
I can’t recall how I came to have a copy of New Pleasures of the Jewish Table, nor do I remember ever making anything out of it. It’s a great little book though, full of socio-cultural food history (and good recipes). It’s a bit short on deep-frying advice, but I rolled my sleeves down, banished the Small Girl to watch rugby with her father and got on with proceedings. Fear factor (and a few dishes) aside, this is a great, family-friendly dinner. Make the tomato sauce first so you’ve got one less thing to worry about.

The fish balls:
700g white fish (I used alfonsino, Denise suggests bream, haddock or cod)
2 onions, peeled and quartered
2 cloves garlic
zest of one lemon
handful of fresh parsley
2tsp ground cumin
2tsp salt
3Tbsp matzo meal (I whizzed up a few crackers in the processor instead)
1 egg, lightly beaten
plain flour, for dusting

The tomato sauce:
2Tbsp olive oil
1 onion, finely chopped
2 cloves garlic, finely chopped
2 x 400g tins of chopped tomatoes
2Tbsp tomato puree
120ml red wine
450ml vegetable stock (or water)

For the sauce, heat the olive oil in a large pot and saute the onion and garlic for a few minutes over medium heat. Add the remaining ingredients and bring to the boil, then simmer gently for 30 minutes. Set aside while you get on with the fish balls.

For the fish balls: Put the onions, garlic, lemon zest and parsley in the processor and whizz until finely chopped. Add the salt, cumin and fish and whizz again to form a smooth mixture. Tip into a bowl and mix through the matzoh crumbs and beaten egg. Dust a couple of plates with flour. With wet hands, take tablespoon-sized amounts of the fish and roll into balls, then place on the floured plates.

To deep-fry, heat one litre of vegetable oil in a deepfryer or in a deep, heavy bottomed pot. Heat to about 200C and fry the balls in batches (about five at a time should do it) until golden brown. When they’re cooked, add to the tomato sauce and heat through gently for about 10 minutes.
Serves 4-6 with rice, couscous or bread and salad.

Now, can anyone tell me what to do with the used oil? Can I pour it down the sink?