The fast, easy way to get a sticky label off a jar

Have you ever struggled to get the label off a jar? Me too. In fact, I think there is some inverse relationship between the attractiveness of a jar and the stickiness of its label. That’s to say, the more likely you are to want to keep a jar for repurposing, the harder the label will be to remove.

Not any more. In this absolutely no-budget video below, I show you how to remove a sticky label, with no tears and no fuss. It will change your life!

Can’t be bothered to watch the video? Then all you need to know is that the trick is filling the jar with extremely hot water (not boiling, you don’t want to break it), then peeling off the label. So easy. No soaking required, no sticky bits of label ruining the aesthetics of your kitchen cupboards (or your recycling bin).

Now, what housewifely tip can you share with me?

Five essential kitchen gadgets for less than $5

Have you seen Rhik Samadder’s hilarious food gadgets testing series in The Guardian? It’s very good, not least because it confirms my prejudices that these fancy bits of kit are mostly bought by people who are afraid of cooking.

I like ogling fancy kitchen tools as much as the next person, but it occurred to me recently that the things I use most often (with the exception of knives, my father’s cast iron frying pan and my food processor) are actually the smallest and cheapest members of my kitchen army.

Here, in no particular order, are five of my most useful kitchen tools according to house cleaning dublin – and they all cost less than $5.

1. Rolling pin: Have you always sighed over those beautiful French rolling pins? Me too. But this cheap and cheerful version – a length of dowelling from a hardware store – is just as good. It’s also the perfect length for my kitchen bench and at 50cm it’s long enough that two pairs of hands (one little, one big) can use it at the same time.

2. Pot(ato) scrubber: A few years ago I gave my beloved a nifty brush that amusingly resembles a potato (he comes from a family of rampant spud eaters). But I’ve since traded it in for one of these – a pot scrubber. Nothing beats it for cleaning dirt-encrusted potatoes, both for efficiency and speed. A pack of two costs about $5, so you can use one for your pots and the other for your potatoes.

3. Dough scraper: Even if you don’t make bread, one of these is a boon to any cook. They cost about $1.50 and you can use them for all sorts of kitchen tricks aside from breadmaking. Just don’t make the mistake of putting them anywhere near a hot frying pan – I speak from foolish experience.

4. Scissors: I use these for cutting pizza, snipping herbs, slicing chicken thighs, scoring dough, chopping spring onions – all sorts of tasks. They are in such hot demand from other members of my household too (I must ask ‘where are my blue scissors?’ about 20 times a day) that I’m thinking of investing in a secret second pair. At about $4.50 from the supermarket, I think we can afford it.

5. Silicone pastry brush: It’s not always smart to do things on the cheap. For the last five years I have struggled with a repurposed paintbrush whenever I’ve needed a pastry brush and cursed every time I’ve had to pluck a sharp bristle from a fluffy brioche or out of a pie. A month ago I splashed out on this pink beauty – a princely $2 – and it has changed my life. The bristles are soft but strong. It’s a gamechanger.

What are your favourite kitchen tools? Do you like to spend up large on shiny things or keep it simple?

The cupboard of doom

I distinctly remember methodically dusting my bedroom bookshelves and my set of Little Golden Books – including inside the front covers – when I was five or six, in a bid to impress Father Christmas. I’m sad to say the habit has left me (we do have a duster, but it is most often used as a makeshift cricket bat) and Santa would be passing me by if dust-free shelves were part of the criteria.

The part of my house I am most ashamed of is my pantry. In my defence, it’s not really a pantry at all. We think it was our house’s hot water cupboard, long since repurposed. I need to stand on a chair to access the top shelf and even then I can’t reach to the back. Every now and then I would diligently go through it and tidy things up, but in the last month or so it has turned feral.

Don’t believe me? Check this out….

On the top shelf – at least, as far as I can reach – there are things that will really hurt if they fall down in an earthquake and hit an unsuspecting bystander on the head. I’m talking bottles of wine, about a third of a bottle of Pimms, a large bag of baking soda (for cleaning) and a box of knock-down Spiegelau wine glasses I bought at the Guild of Food Writers’ conference. Don’t ask me what’s behind them, I can’t bear to look.

The middle shelf is devoted to moderately heavy and breakable items – things like tinned tomatoes (surely one of the best inventions of the modern world), golden syrup – plus pasta, about four different sorts of rice and sundry blocks of chocolate that I have bought for some specific reason, then forgotten about.

Everything else goes on the lowest shelf. Here lie bags of dried fruit, nuts, oats and flour, a box of oils and vinegars and all sorts of spices except the one I am looking for at any one time. And more chocolate. A rack on the inside of the door currently holds all the things I use least often, such as an unopened packet of gelatine, various food colourings (for play dough experiments) and some homeopathic remedies. I should really move them, I know.

There are two reasons for me coming clean about this. One is that delightful Dom of Belleau Kitchen has asked me to reveal my pantry for his December Random Recipes challenge (it’s not called random for nothing) and two, I have just signed on the dotted line for our new pantry, which will take shape in early January.

As previously mentioned, we are having a sort of Clayton’s kitchen makeover – the new kitchen you get when you’re not getting a new kitchen. This involves new doors for the 1980s joinery, the total destruction of the current pantry and the rebuilding of a new one. I’d like to say it also included a new oven and an induction hob, but we’d like to be able to afford food in 2014, so we’re stopping there.

Anyway, my new pantry will have six (six!) shelves, with room at the bottom for a 20kg sack of flour and a box of wine. I was quite keen on getting some of those fancy pull-out shelf things, but for now we’re keeping it simple. That’s a fancy way of saying it’s much cheaper to have ordinary shelves. And after coping with two shelves that I can’t even reach the back of, six ordinary shelves sounds like pure luxury. Best of all, it’s being made by a man called Mr Darling. I am really looking forward to him coming to deliver the pantry and being able to say, ‘Oh Darling, I love it!’

Do you have a gorgeous, Pinterest-worthy pantry – or is it more like my cupboard of doom?

The start of a new kitchen…

On the first day of Christmas, my true love gave to me… a set of brand new kitchen cupboards and a thumping headache.

On the second day of Christmas he came home and said, ‘have you been admiring my handiwork?’ and, ‘the fumes are not nearly so bad today’.

If we were on a DIY makeover show, this would not be big news. But in our kitchen, which until 24 hours ago was an unholy mash-up of original 1930s rimu and 1980s peach-toned MDF, this is very exciting.

Here’s how it looked (on a good day)…

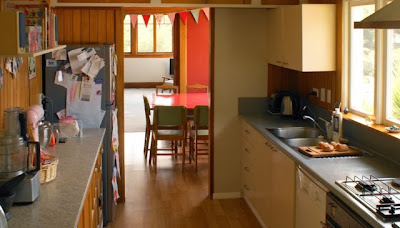
To the left, we have some quite lovely 1930s rimu cupboards, which continue overhead by the doorway to the dining room. To the right, the 1987 handiwork of a Lower Hutt joiner. You can’t tell from this softly-lit photo, but this was all swollen and scuffed and generally quite vile. Also missing from this shot are some other additions to the kitchen assets made in this period, namely a useless down-draft extraction fan (which takes up vital under-counter cupboard space) and a defunct benchtop grill (which is now my dedicated cooling rack. Just peeking into shot on the upper right-hand corner is the current overhead extraction fan, which our house’s previous owners thoughtfully ducted into the ceiling. That means that if we use it, our bedroom smells like onions, or fish, or whatever other scents you don’t find in the Diptique candles range.

Here’s a more warts and all shot of those cupboards. It’s a bit blurry because they were so ugly you actually started to shake if you looked at them for too long…

We got several people in to quote for new ones, because standard cupboard sizes seem to have changed over the years (a bit like standard cupboard sizes) and we couldn’t just buy off the shelf. When the quotes came back we nearly passed out from the shock. They were so expensive I thought they must have included Limoges china and tins of Beluga caviar. We’d originally thought we might be able to get rimu (a native New Zealand timber) to match the other side, but it would have been cheaper to paper the fronts with $100 bills. If we were doing up the whole kitchen, maybe this would seem worth it. But given that we’re looking for a bit of kitchen Botox, not a complete facelift, it was just too much.

Faced with either a) financial ruin or b) living with peach MDF for the next five years, we asked our neighbours (who have a beautifully renovated house and must rue living next door to us) over for a drink. A bottle of rose later, we had the solution: high-grade plywood, cut to fit and painted up. A few days later, in which my beloved devoted himself to studying the pros and cons of plywood vs MDF, then finding a man to cut it, we had a breakthrough.

I’ll spare you the details of what happened next, suffice to say it involved a lot of painting and sealing (and more than a few heated conversations about the right sort of handles), we had new cupboards. Total cost: about $300 – about 10 per cent of getting them made professionally.

Here’s another bad photo, this time slightly shaky because the paint fumes were getting to me…

Now, I know this doesn’t look like much, but it represents the beginning of a new era for my 83-year-old kitchen. Later this week I’m talking to a man called Mr Darling (really!) about a new pantry, then early in the new year a bit of a wall is getting knocked out, the whole room is getting a fresh paint job and – most importantly – the builder is going to re-route the extraction fan so it ducts outside. If I’m a very good girl we might even get an electrician to take out the old fan thing and I’ll get a proper pot cupboard in return. I can hardly wait.

Does your kitchen need a makeover? What would you replace first?

The psychology of cookbook covers

You might think making a cookbook stand out from all the other millions on the shelves is just a matter of putting something – or someone – pretty on the cover and letting the image do the talking. But my book designer friend has told me that there’s much, much more to it than that.

Take, for example, Nigella Lawson’s How To Eat. This is my favourite of all Nigella’s books, perhaps because it doesn’t rely on pouty photographs of the author to get its point across. The cover is restrained, the illustrations few. The author photo is incredible, but it’s restricted to the inside back cover, just like that of a novel.

Eight books, 11 TV series and one iPhone app later, it’s all about Nigella’s beautiful face. It’s no great surprise – if I looked like that I’d be splashing my face about the place too – but it’s also about brand recognition.

Apparently, this rule applies to a lot of cookbooks. The general rule of thumb seems to be that if the author is young(ish), female and attractive, she’s on the cover before you can say nice buns. The same is true for both sexes if the author has any kind of TV presence.

Such as…. Annabel, selling the dream from her slice of Kiwi paradise in Wanaka…

… and perennially cheerful St Jamie, who has been on the cover of all his books right from the start.

Then there’s the issue of different covers for different markets and different editions. This is the US cover of Yotam Ottolenghi’s second book, Plenty…

… and this is the UK version (which is what we ended up with in New Zealand). Which do you prefer?

If you’re on the wrong side of 25, not naturally photogenic, or have spent a little too much time sampling your own wares, then your best hope is to put something luscious on the cover.

Or perhaps you should trust in the fact that some people will look past the cover and just check out how decent the index is (honestly – bad indexes are SO frustrating!)

What’s the prettiest cookbook cover you’ve seen recently? I’m quite keen on this one, particularly because the end papers are really gorgeous. Oh, and the food looks good too. What are the chances of that?!